Getting Started With Rails
There are many factors that make a good framework, and you’ll find that many frameworks have been swapping places over the years. Thus, it’s not always easy to pick a framework to work with, especially if you’re just beginning with web development. Today, we’ll be exploring the Ruby on Rails framework, one of the most popular frameworks that people don’t seem to stop loving!
What is Rails?
Rails is an MVC web development framework that leverages the Ruby language and its perks to address productivity and development speed for developers. It’s one of the most used web frameworks, according to SimilarTech it’s powering over 2 million websites, including some of the biggest names like Airbnb, GitHub, and CodeAcademy. Rails is a versatile framework, it could be used as a complete server with powerful template rendering or it could be consumed as a RESTful API. It supports both options right out of the box. Rails also integrate well with frontend frameworks, especially React.
Why use Rails?
Advantages of Rails
Batteries Included:
Rails brings a lot of powerful features out of the box, with some already implemented security solutions, powerful scaffolding and code generation, and a rich ORM layer. Right when you start a new Rails project, JSON API builder gets set up, with a Puma web server. You’ll also have access to some already implemented security solutions, authentication mechanisms, and the best part of it is that you can take what you want and leave the rest, so you get that much of already configured features but you don’t lose flexibility in return.
Easy to learn:
It’s fairly easy to pick up Rails, Ruby itself is a simple dynamic language that’s similar to Python. It’s not only the fact that Rails is easy to pick up, but the official documentation of the framework will allow you to build complete applications and it’s quite thorough as well.
One of the hidden gems of Rails that you might not know at first are the screencasts like RailsCasts and GoRails. These are community held tutorials and casts that will help you get your first application running, as well as build complex features and perform advanced tasks that you didn’t even think are possible. You can use the one of the best recommended Ruby on Rails Tutorials.
Time to market:
One of Rails strongest features is the speed of development. Rails was made with the developer in mind, and it works on boosting the developer’s productivity and increasing the development process efficiency by eliminating the need to write boilerplates and instead, follows a Convention-Over-Configuration pattern to make sure developers spend their time doing tasks that are actually worth it.
Security:
Rails address the security issues that most developers might encounter and starting with Rails 5, a few features are being enforced to prevent beginners from doing lethal mistakes in development. Their documentation on different web attacks and how to defend against them in Rails is also quite useful.
Disadvantages
Steep Learning Curve:
Rails is extremely easy to pick up and get running with, and you can even develop applications without going through many complexities. But when your requirements grow bigger, you might have to delve into the framework itself and unravel some of its magic, since a big part of Rails is the magic behind the curtain. The learning curve becomes quite steep and you might be a little bit uncomfortable at first, with the syntax since the transition is a little bit severe.
Deployment:
Deploying a Rails application isn’t as easy as it should be. Unlike other languages like PHP, Ruby isn’t that supported out of the box, and you might need to use a containerization platform like Docker to be able to easily deploy your application. There are options of course that support Ruby, they just might not be under your radar, you can check Google’s App Engine as well, their documents state that you can deploy a Rails application with the click of a button.
The Scalability Myth:
Most websites out there will tell you that Rails isn’t scalable and it’s bad for big businesses, and you might even find official frameworks pages stating that you should replace Rails with their frameworks because Rails is not scalable.
Well, guess what, Rails is scalable! It’s just that scalability was not made easy as other features were, the evidence is in fact, that high-traffic websites like GitHub, Zulu, and Shopify have been able to operate at a large scale with Rails.
The Rails core team stated that they will address this myth and help developers scale their Rails applications with the release of Rails 6. Since this is one of the things that might scare newcomers, I wanted to get that out of the way.
Understanding Rails:

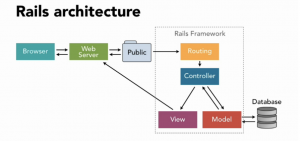
Rails use an MVC architecture, and we stated that earlier.
The model in rails is the ActiveRecord module, which is a rich ORM layer that allows you to deal with the database without having to write complex SQL.
The Controller in rails is the ActionController module and the View is the ActionView module, together, ActionController and ActionView are called ActionPack, in case you came across the name. The controller is where you put down your business logic and manage the application’s flow, it’s also responsible for the data processing and exposing the data needed to the view after fetching them from the model.
The view then fills the template with the data and compiles the page from ERB ( the templating language) to HTML.
Rails follows two important patterns which are Convention-Over-Configuration and DRY.
Convention-Over-Configuration means that you don’t have to keep on taking the decision of how to implement certain features that are common between most websites, and rewrite the infrastructure from scratch. Instead, your focus should be towards deciding how your business logic and selling points are reflected in the development process and how to create a better application overall. That’s why in Rails, there’s most probably a library or a gem for everything that you want to do, it doesn’t mean that you have to use it, but it’s there in case you need it.
DRY stands for don’t repeat yourself, which means that whenever you find yourself repeating some pieces of your code, then there’s probably a better way to do things as Rails aims for eliminating these repetitions with features like dynamic methods and dynamic dispatch. So if you ever find yourself copying and pasting in Rails, you should be alarmed.
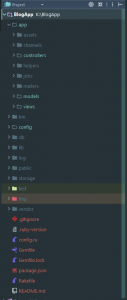
You’ll notice that there are actually more files inside the typical Rails app and not just models, views and controllers. Let’s go through each one quickly.

App folder:
The app folder contains your models, views, and controllers along with other core folders.
Assets: This is the CSS, Images, and JS ( written in CoffeeScript, a language that compiles to Javascript)
Channels: This folder is related to the ActionCable module which is used for real-time applications. You can just ignore it when you’re starting to learn the framework.
Helpers: Helpers are an important module of Rails. Generally, when developing with an MVC architecture, you should keep the code execution in the View layer as minimal as possible, which means you should also try to write less code in there. Helpers help you create and expose methods to the views so that the view can directly use the method.
Jobs: ActiveJob is also an advanced module used in queueing tasks at the backend and running tasks asynchronously. It’s a powerful feature to prevent blocking delays from external APIs, but you can also ignore it when you’re just starting with the frameworks.
Mailers: ActionMailer is the module responsible for sending messages between users or sending emails. It operates in the same manner that ActionController does and also possesses a view for the display of the data.
The config folder contains the configuration files, such as the environment-specific controls and configurations. The initializers, the local variables of the application, the server configurations in the Puma.rb file, and the routes file.
Routing in Rails is quite straightforward and it’s much simpler than Django and Laravel. A typical route would be something like this. Get specifies a get request of login as a sign_in URI and let the session controller handle it with the action new. The resources route defines the default CRUD (Create Retrieve Update Delete) operations for a resource with 7 default actions: New, Create, Show, Index, Update, Delete, Destroy. By saying resources :articles you define 7 routes each with the corresponding method, how cool is that!
The DB folder is where you’ll have your schema, your migrations which are the incremental changes to your database structure, and the seeds.rb file where you can create the application’s data for testing and development.
There are a few words that you might hear quite often, and I believe you’ll be more comfortable using Rails if you know what they mean:
Rake: Rake is an internal Domain Specific Language programmed in ruby, it’s a build language similar to Make and Ant. You can read more about it here.
Rack: Rack is an adapter layer that sits between frameworks( Rails, Sinatra, Hanami) and web servers(Unicorn, Thin, Puma). Rack is a Ruby-fied Command-Gateway-Interface. You can read more about it here.
Bundler: Bundler is a ruby package manager and dependency resolver. It solves the common problem of having one package that depends on a certain version of a library, and another package that depends on a different version of that same library. It’s responsible for managing these dependencies and there’s a lot it can do.
Rails Workflow
It might not be clear how a Rails application works even if you know the common MVC workflow, so let’s walk through it.
When the server receives a request, the request is sent to the router. The router then determines which request is it and where does it want to go. Then, the router sends that request to the appropriate controller action. The controller action is then fired and the server renders the application layout template. The yield keyword will allow the template to render the view that corresponds to the executed controller action, inside the body section. The template then is compiled to HTML and is sent back to the requester.
Of course, this is not the only way to do things in rails, you can also use the render method to render any specific view you want, in case you have a view that doesn’t correspond to a controller, for example. But as far as the beginner level goes, these issues might not concern you at all. In fact, you can build entire web applications without having to use them.
Resources
One of the best things about rails is the abundant amount of resources from videos to ebooks, even the official documentation of the language and the framework are quite rich and full of example.
Courses: Ruby On Rails Specialization by Johns Hopkins University offers some of the best courses for Rails. The courses get straight to the point and cover some of the advanced topics and best practices that developers should be aware of. The assignments help you wrap your head around everything that was explained and they’re not as simple or easy as other courses offered online.
Videos: RailsCasts, although having stopped 4 years ago, is still very useful and practical. GoRails is still working today, but you’ll need to subscribe for the pro content.
Ebooks: Ruby On Rails tutorial is an amazing reference to begin with. Michael Hartl’s books are quite educative and thorough, you can also search for David B. Copeland’s books for more advanced topics with the flavour of beginner walkthroughs.
Official Documents
Getting Started With a Blog Application
We’ll build a simple blog application where you can create and manage your articles, with an authentication solution, it’s similar to google documents and you’ll see how easy it is to build such an application in rails, you will find the code for this application on this repository so that you could follow along.
Open a command line and go to the directory where you want to create your application. Enter the following command which will create a new rails application with the most recent version of Rails available.
rails new BlogApp
Once it finishes creating the files, it will start running the bundle by default, bundler is the package manager that handles the different dependencies that your gems might be using. You can also create the application with a specified version of Rails, prevent it from running bundler at creation, or create your application in an API mode only, the later was only made available on Rails 5.
Since we’ll be using it a lot, let’s explain first what’s a Gem file. Gems in Rails are similar to libraries and packages for other languages, it allows you to use reusable pieces of code without having to reinvent the wheel for everything.
Gems in Rails are quite powerful, as you’ll discover that the community has contributed to the creation of a numerous amount of useful gems that handle even the smallest details, these are tools that other developers put time into creating, for you to use directly and save time.
All you have to do is add the gem to the gemfile as we did with bcrypt and devise and manually run the bundle command. Each time you add a gem you run the bundle command.
Bcrypt is a security gem, and we can use it to create our own authentication solution as it helps it to create a secure password and authenticate users. But to show you how powerful it is, we’ll use Devise, which is a popular authentication engine that will give us an entire authentication solution out of the box. After adding the gems, run bundle install, if you come across the cp 720 on your windows, make sure you change your page encoding by typing: chcp 1252
| gem ‘bcrypt’, ‘~> 3.1.7’ | |
| gem ‘devise’ |
Now we run the command devise:install to set up the Devise engine
rails genetare devise:install
and then generate a new user with the command devise user.
rails generate devise user
Now if you go to the /app/models/user and you will find that Devise created a model for you. If you want to generate the controllers or the views of that model to modify them, you can do that by running rails g devise views users.
Also, note that Devise is giving you the ability to customize the use of modules, each module is responsible for a certain bunch of features, confirmable, for example, allows you to send confirmation emails and trackable allows you to track the IP address of a user, and store that information. You can learn more about the modules from their GitHub documents, but for now, we’ll go for the default configuration.
| class User < ApplicationRecord | |
| # Include default devise modules. Other Avaialavbles are: | |
| # :confirmable, :lockable, :timeoutable, and :omniauthable | |
| devise :database_authenticatable, :registerable, | |
| :recoverable, :rememberable, :trackable, :validatable |
Now, you can go to the command line again and we can start creating our article object.
Rails provides you with a handful number of generations that you can use, you can generate models, views, controllers, or all three together with a scaffold.
We’ll go ahead and scaffold the article resource, and specify the attributes of the model. The default attribute type is String, so we don’t need to specify the title type, but the text needs to be of the type Text, and we also specify that the article table references the user table, which means that each article belongs to a certain user.
rails generate scaffold Article title text:text user:interface
Once we run the command, we should have everything ready on the article’s side.
We’ll go ahead and make things even better by adding validations in the article model, to make sure that all instances created in the database have a title and include some text, to prevent saving empty objects. You can also write your own custom validations, but we’ll try to keep things as simple as possible.
| class Article < ApplicationRecord | |
| belongs_to :user | |
| validates :title, :text, presence: true | |
| end |
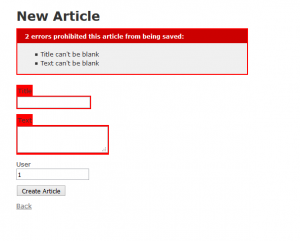
If you attempt to create an article without a title or a text you’ll get these errors.

One thing to keep in mind is the fact that even though user:references defines a has_many relationship in the articles model, it doesn’t get defined in the user model, so we’ll go ahead and add the belongs_to :users relation. Now we can run the rake db:migrate command to populate these changes and create the tables in the database through the migrations.
Now our models are ready, let’s move ahead to the controllers.
If you type rails s command now and go to localhost:3000/articles, you will find that anyone can access the articles even if he’s not a logged in user, and he’d also have access to all articles. So we need to restrict the application to logged in users, and only let them manage their articles and not everyone’s.
In Rails, you can define certain functions to run before the appropriate actions take place, using before_action. We don’t even have to write the function that checks if the user is logged in or not, as Devise provides us with a ready method called authenticate_user. All we have to do is add the before_action filter with Devise’s method to the application controller and it will do the job for us.
| class ApplicationController < ActionController::Base | |
| before_action :authenticate_user | |
| end |
Now if you try to access localhost:3000/articles you will be redirected to a login form.
Now we need to customize the controllers so that they don’t load the entire article model for every user. It’s really easy to do so in Rails. All we have to do is add a function that sets a user variable before executing any action on the article’s controller. Current_user is a method provided by Devise that retrieves the current logged in user object
| def set_user | |
| @user = current_user | |
| end |
After setting the user, we load only his articles by chaining the command @user.articles instead of loading Articles.all. Now the articles controller will look something like this.
| class ArticlesController < ApplicationController | |
| before_action :set_user | |
| before_action :set_article, only: [:show, :edit, :update, :destroy] | |
| # GET /articles/1 | |
| # GET /articles.json | |
| def index | |
| @articles = @users.articles.all | |
| end | |
| # GET /articles/1 | |
| # GET /articles/1.json | |
| def show | |
| end | |
| # GET /articles/new | |
| def new | |
| @articles = @users.articles.new | |
| end | |
| # GET /articles/1/edit | |
| def edit | |
| end | |
| # POST /articles | |
| # POST /articles.json | |
| def create | |
| @articles = @users.articles.new(articles_params) | |
| respond_to do |format| | |
| if @article.save | |
| format.html { redirect_to @article, notice: ‘Article was succesfully created.’ } | |
| format.json { render :show, status: :created, location: @article } | |
| else | |
| format.html { render.new } | |
| format.json { render json: @articles.errors, status: :unprocessable_entity } | |
| end | |
| end | |
| end | |
Now you can run the server with the command Rails s, and go to localhost:3000/articles, you will be prompted to login/signup, once you’re logged in, you’ll be able to create, delete, update or retrieve your articles at will! Look at how easy that was.
Source: hackr


